| Finding Flint Tools
It’s important to understand the
geology of the area in which you are searching, so reading the
literature is an essential first step. Many prehistoric sites have been
documented and some of them remain accessible today, especially gravel
workings and ploughed fields.
Look in libraries and museums for local archaeological books,
papers and maps and descriptions of local discoveries in the past.
Even Victorian accounts can be a useful guide. Join your
local archaeological society.
Search the literature and the internet for references to previous
finds. If implements have been found before in a particular field
or quarry, that could indicate some kind of camp or settlement and
there may be other tools there.
Getting this information is often difficult and may well
take some persistence but it is the best indication you can get of
a fruitful place to search in your area. Some important
reference books are listed on the Books page.
There are also many valuable online resources. One such
website is ARCHI
which gives a county-by-county and town-by-town list of more than
100,000 archaeological sites in the UK.
Become a member of the Portable
Antiquities Scheme. The PAS site has a massive database with
photographs and details of thousands of find spots.
Where to look
Early humans often lived near rivers. As well as
providing drinking and cooking water, rivers also provided a
simple means of navigation and also opportunities to trap animals
who came to drink.
As a result, many artefacts ended up being swept into rivers,
rolled along, and deposited along with other, unworked, flints
into deposits known as river terrace gravels. Wherever such
terrace gravels are exposed in fields or extracted for building
use, there are often good places to search.
Most large rivers, such as the Thames, Medway and (ancient) Solent,
have left terrace gravels on the sides of the valleys that they
cut in historical times. Today those gravels are often dug for
building purposes or exposed in fields.
People in Mesolithic and Neolithic times often re-used flints that
they found lying on the surface, made flakes and left them behind
when they moved on. So you can find sites of habitation in
ploughed fields.
It is, of course, essential to get permission in advance from
the owners of the land or operators of the quarry.
Here's a tip that has worked for me many times. If you see
ploughed fields that look promising, study the Ordinance Survey
maps closely and keep your eyes open as you ride around the area (bicycle
is best). You will almost certainly find a footpath sooner
or later that crosses or runs close to your field. Walking the
footpath is a good way to do some reconaissance to see if you are
likely to find anything there and hence whether it is worth
approaching the landowner.
Design styles
It is important to familiarise yourself with the most common tool
designs of each period, so that you understand how the tools were manufactured.
For instance, in the early stone age, it is common to find hand
axes of so-called Acheulian design (name from St Acheul in France
where such implements were first discovered and described). These
are beautifully made and are artistic objects.
Paradoxically, in
Mesolithic times, hundreds of thousands of years later, the
commonest tools are flint flakes and scrapers.
These appear to be more crudely designed and made than the
elegant early implements. In fact they are a technological
advance, because by making flake tools instead of core tools,
humans made more efficient use of their flint - they got a
dozen tools where before the only got one. And small flakes could
be fitted into a wooden handle to make long knives, scythes and
even saws for felling trees.
Be persistent
As with finding fossils of all kinds, it’s a question of
“getting you eye in” so don’t give up too easily at the
beginning. At first you may look despairingly around a field and
see only ordinary flints. With practice, you may come to realise
that the ordinary looking field is actually littered with
implements, once you know what you’re looking for and how they
appear in situ, and you will wonder why you couldn’t “see”
them before.
Logging finds
If you wish your finds to be of scientific value now or in the
future, you may wish to buy a handheld GPS positioning device.
This can help you locate places on an Ordinance Survey map very
accurately, and also to log your finds exactly. Some
devices can be pricy, but there are some lower cost devices such
as the Garmin eTrex H Handheld GPS. You can also look on
eBay for second hand devices.
How to plot a findspot using the Garmin Etrex
Switch on (power button) and you'll see the ‘satellite page’.
When the receiver is ready to use (once it has tracked satellites)
it will display the message ‘ready to navigate’. Use the
‘page’ button to get to the ‘menu’ (4 clicks of the
button). Then select ‘mark’ using the ‘enter’ button. The
National Grid Refrenece (NGR)
of the findspot (e.g. TQ 12345 67890) will be shown below a man
holding a flag. Press the ‘enter’ button when ‘ok’ is
highlighted if you want to save this ‘waypoint’.
To use a GPS device when you find a flint do the following:
Take a reading from your GPS device. Write the reading on the tag
of a collecting bag. Place the find in the bag and seal it.
The latest generation of digital cameras (such as Panasonic)
can register the GPS position at which a photo was taken. If
you can afford it, this simplifies recording find positions
considerably as all you have to do is photograph each find in
situ, making sure it is clearly identifiable.
|
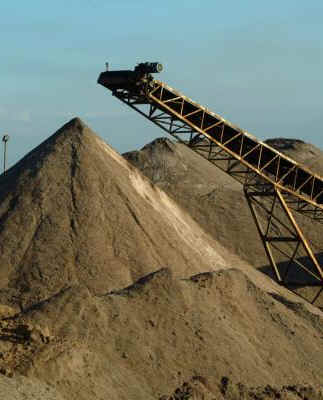
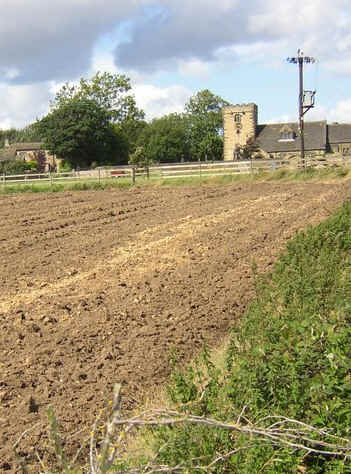
Gravel workings (above) and ploughed fields (below) are often
fruitful places to search - as long as you get permission first!
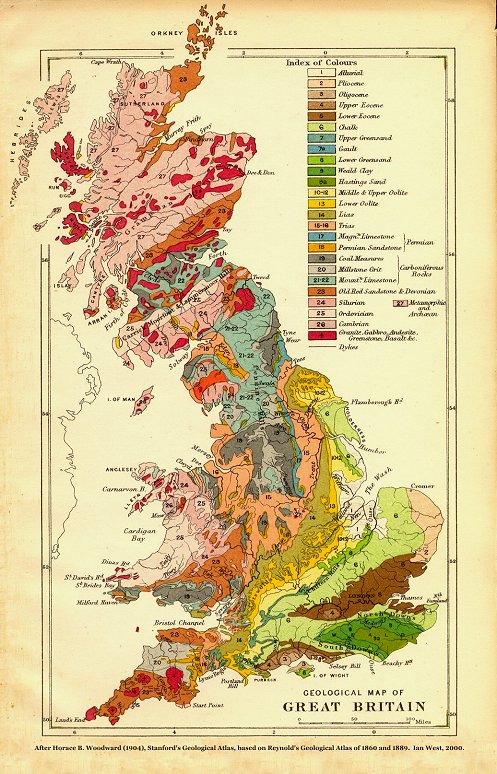
Understanding the geology of the area in which you are
searching is essential. Old maps, papers and books are
invaluable sources of reference.
 |